Adjusting the flush mechanism in your toilet seat is often easier than you think. Most problems are due to incorrect settings of the float, flush button or water valve. With the right technique, you can solve common problems such as continuous water flow, weak flushing or stuck flush buttons. This guide will help you understand the flushing system and make the necessary adjustments for optimal performance.
What is a flush mechanism and how does it work in the toilet seat?
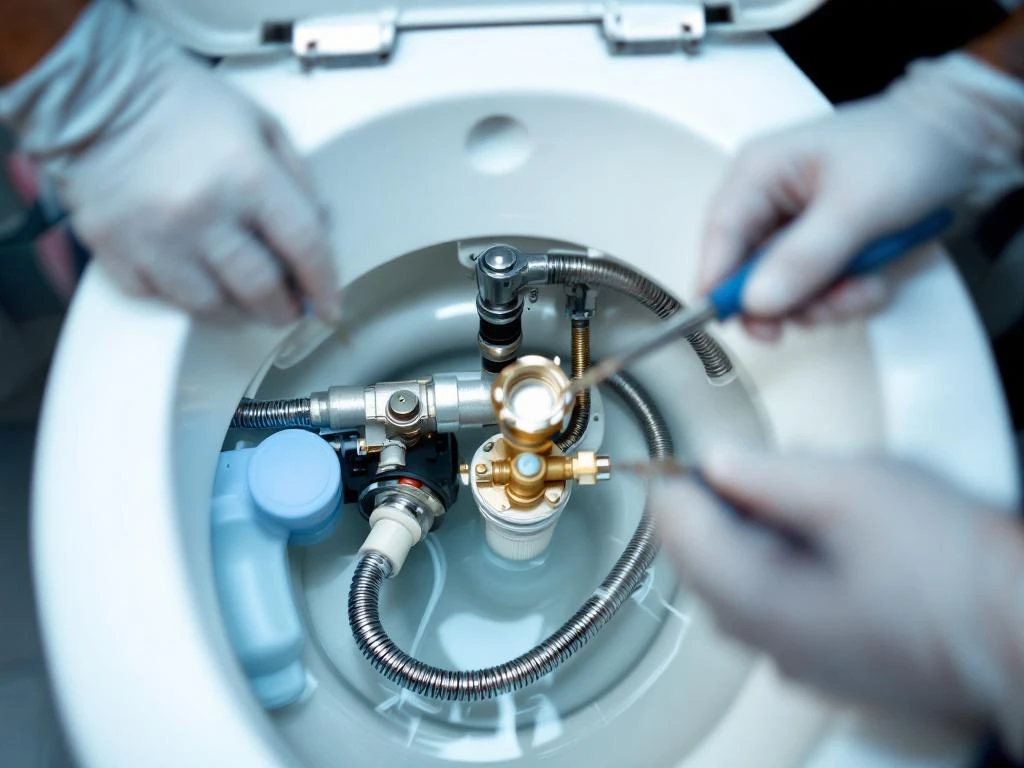
A flushing mechanism consists of several key components that work together to deliver the right amount of water at each flush. The main parts include the flush tank, the float, the water valve and the flush button which all need to work correctly for optimal performance.
The flush tank acts as a water reservoir that fills after each flush. When you press the flush button, a valve at the bottom of the tank lifts, allowing water to rush into the toilet bowl. At the same time, the water level in the tank drops, causing the float to sink and open the water valve for refilling.
The float controls the water level by shutting off the supply when the correct level is reached. This system ensures that the tank always contains enough water for the next flush without wasting unnecessarily. The water valve regulates the inflow and closes automatically when the float reaches its highest position.
What are the most common problems with the spool mechanism?
The most frequent problems include continuous water running, weak flushing, flush buttons sticking and float failure. Continuous water flow is often caused by a float that does not close the water valve correctly or a flush valve that does not seal properly against its seat.
Poor flushing is usually due to a low water level in the tank or a blocked flush valve. This problem is noticeable by the toilet bowl not flushing all the contents effectively. Stuck or unresponsive flush buttons may be due to wear in the mechanism or misalignment of the chain or rod that connects the button to the flush valve.
Float problems occur when this component does not move freely or has become damaged. A malfunctioning float can cause both overfilling and underfilling of the tank, which affects flushing efficiency and can lead to unnecessary water consumption.
How to adjust the float for optimal flushing?
Adjusting the float starts with identifying the type of system you have. Older systems use a float ball on an arm, while modern systems often have a cylindrical float that slides along a vertical rod.
For older float systems, gently bend the arm upwards to raise the water level or downwards to lower it. The correct water level is usually 2-3 centimeters below the top of the tank. Check that the float moves freely and does not get stuck against the tank walls or other components.
Modern float systems are adjusted by moving the clamp that holds the float on the rod. Pull the float up for higher water level or down for lower level. Test the system by flushing and observing how the float moves. It should drop evenly as the water drains out and rise steadily as the tank fills.
What to do when the flush button does not work properly?
Flush button problems are often solved by adjusting the connection between the button and the flush valve. Check that the chain or rod connecting the button to the valve is the correct length and not too tight or too loose.
A chain that is too short prevents the valve from closing properly, causing continuous water flow. Too long a chain prevents the button from lifting the valve enough to start flushing. Adjust the chain length so that there is about one centimeter of slack when the valve is closed.
For flush buttons that get stuck, clean the area around the button and check that it moves freely in its mount. Sometimes you need to adjust the position of the button or replace worn parts. Test the button several times after adjustment to ensure smooth operation.
How 24 Center helps with toilet problems and flushing mechanisms
We at 24 Center offer professional assistance with all types of toilet problems and flushing mechanisms around the clock, every day of the year. Our qualified plumbing technicians have expert knowledge in:
- Emergency toilet repairs and WC repairs
- Adjustment and replacement of complete coil systems
- Troubleshooting of complex spool mechanisms
- Installation of modern, water-saving toilets
- Preventive maintenance to avoid future problems
Our local technicians are familiar with the Swedish building stock and can quickly identify and solve both simple adjustments and complex installations. We understand that toilet problems rarely come at convenient times, which is why we offer fast response time and reliable service when you need it most.
Contact us on 08 40 24 240 for immediate help with your toilet problems, or book online for less urgent toilet repairs and maintenance work. Read more about our services to find the solution that best suits your needs.
Frequently asked questions
How do I know if the water level in the flushing tank is set correctly?
The optimum water level is 2-3 centimeters below the top of the tank or at the mark often found on the inside of the tank. If the level is too low, you will get weak flushing, and if it is too high, you risk overflowing and wasting water. Check the level when the tank is completely filled after a flush.
What should I do if my toilet continues to flush after adjusting the float?
If the problem persists after float adjustment, check the flush valve at the bottom of the tank. It may be deformed or have trapped debris that prevents it from sealing properly. Lift the valve up and clean both the valve and its seat. If the valve is damaged, it needs to be replaced.
Can I use common household tools to adjust the spool mechanism?
Yes, most adjustments can be made with basic tools such as a wrench, pliers and possibly a screwdriver. For float adjustments, you often only need to use your hands to bend arms or move clamps. Always turn off the water supply before starting work.
How often should I check and maintain my flushing mechanism?
Check the flushing mechanism every six months by listening for unusual noises and observing the efficiency of the flushing. Clean the float and check that all parts move freely. Preventive maintenance can extend the life of the system and prevent expensive repairs.
What are the signs that I need to replace the entire spool mechanism instead of adjusting it?
Replace the mechanism if several components are cracked, corroded or worn, if the problem recurs despite repeated adjustments, or if the system is very old and spare parts are difficult to find. Modern flushing systems are often more water-efficient and can provide long-term savings.
What is the cost of having a professional HVAC technician adjust the flushing mechanism?
The cost of professional adjustment varies depending on the complexity of the problem and the time of day, but is typically between 800-1500 SEK for basic adjustments. Emergency call-outs can cost more. Contact 24 Center for a free assessment and transparent pricing.
Are there any safety risks I should be aware of when adjusting the spool mechanism myself?
Always turn off the water supply before starting work and be careful with ceramic parts that may crack. Avoid using too much force when adjusting components. If you feel unsure or encounter complicated problems, contact a professional technician to avoid damage to the toilet or water system.